Hello sweetpeas!! Welcome to our first little tutorial, I'm so excited to be able to make this for you and I hope it can be encouraging and maybe help teach you something new! Today we're going to be painting a bunnyfly (bunner-fly? I'm workin' on the name!)

I'm going to be painting in oils, and I paint in a technique called Alla Prima, or "all in one"! You are welcome to paint along in this style with me, or please feel encouraged to use whatever other paint and supplies you have available, and just skim over the general "guide" I've made! At any point please feel welcome and encouraged to deviate from my painting path, this is meant to be a space where I want you to feel encouraged to make whatever you feel the most drawn to <3
Supplies I'm using:
- - Gamblin Galkyd Liquid Medium for oil
- - Gamblin Gamsol Mineral Spirit for oil
- -5x7 Gessoed Canvas
- - Palette Knife (you can use plastic spoons!)
- - Paint Palette (I'm using plastic over another canvas since my glass palette is dirty today! Ceramic and glass work very well for oils!)
- - Winsor and Newton 'Winton' Oil Colors: Alizarin Crimson, Cadmium Red, Lemon Yellow, Yellow Ochre, Ultramarine Blue, Pthalo Blue, and Titanium White
- - Craft Brushes, Filbert Shaped (generic cheap brushes! Filbert brushes specifies that they're the semi-curved tips!)
- - Paper Towels
* If you're using water based paints like acrylic or watercolor (or gouache!) you'll replace the liquid medium and mineral spirits for water
Paint Mixing!
For the sake of this first little tutorial, I really want it to be as simple and welcoming as possible, as well as accessible supplies-wise! So for that reason I'm sticking to just primary colors in a warm and cool bias :)
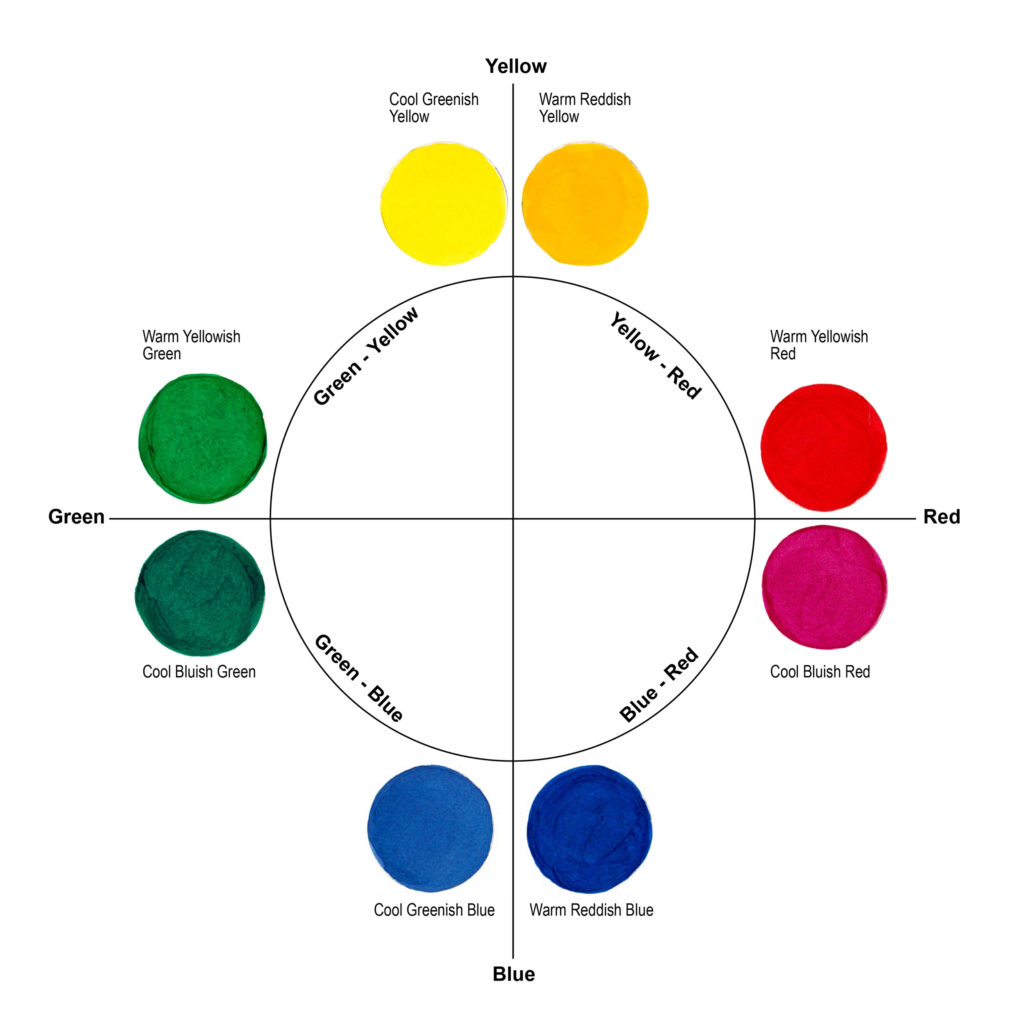
What is color bias? To put it simply, it's how warm or cool a color is! This is a super fun part of color theory that will really help when mixing paints. We know that on the color wheel we have colors divided into 2 "temperatures". Red, orange and yellow are warm, and green, blue and purple are cool! But even different hues of the same color, can have a different bias! Some reds can be more "warm", while others may be more "cool". This all comes together when you're trying to take two primary colors to make a secondary color. If you want to make green for example, you mix blue and yellow! But let's say you try and mix a cool blue with a warm yellow- the color may be more "dull" or mid-tone than if you mixed two cool tones! I'm going to attach two articles here that explain in extensive detail color theory as it relates to warm and cool biases for paint mixing, and I hope they can be of help in our journey today! :)
Mineral Spirits & Liquid Mediums for Oils
When working with oils, often artists choose to use mediums that can change the texture, dry time or flow of the paints! There are some very neat paints you can buy now that are water soluble oils, but here I'm just going to talk a little about mediums since that's what I'll be using!
It's important to note that many oil mediums, and paints themselves can be both toxic and flammable, and it is very important to use them safely. Here are some basic practices to use when handling oil paint and mediums:
- - Always work in a well ventilated space
- - Keep paint waste sealed in air tight containers to dispose of properly at a waste facility. Keep any paint scraps or used medium in a cool, dry place
- - Always wash your hands before eating/putting your hands in your face if you're painting
- - Clean reusable rags with warm soapy water, same with brushes!
- - Put paints away when done, either in a re-sealable palette, or away from where pets/kids have open access to them
I typically just dip my brush in a bit of the galkyd as I need it, much like you would use water when painting with acrylics. I use the gamsol to help clean my brushes! Since oils have to be dissolved, I use the gamsol and towels to clean pigment off of my brushes.

I'm starting off with all of my paints spread out, and I'm going to start out by mixing pastel tints of my rainbow colors (ROYGBV)

To do this I just put down 6 spots of white and mixed in cool hues for all of my colors. I'm using my crimson, lemon yellow and pthalo blue for RYB, and mixing them respectively for GOP.
Red + Blue for Purple
Yellow + Blue for Green
Yellow + Red for Orange

To start making our rainbow we're going to make full horizontal brush strokes across the canvas, and using white in between to help us blend our colors! (plus a little bit of our liquid medium for flow!)


 For blending I recommend broad, wide brushstrokes that fully flow in between the established colors you want to blend. Using a little bit of white and liquid medium can help dilute the pigments and soften the transition of color. When I'm blending here, I'm letting my brush fully go back and forth on the canvas, end to end, without lifting my brush for a very smooth effect!

And now we're going to outline our bunny friend!! I'm linking the reference image I'm looking at here
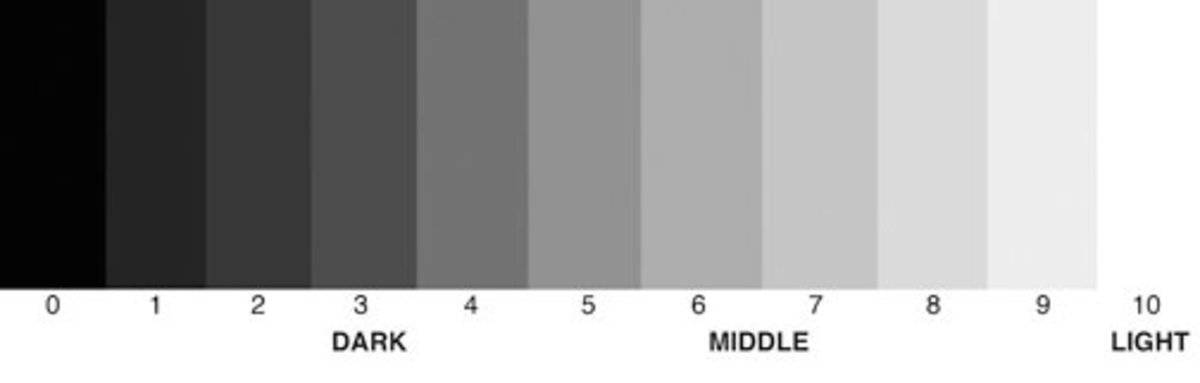
Reference images are so helpful, especially when painting from life. I'm doing my sketch in a mid-value purple, meaning it's in the "middle" of light to dark!

I chose that I wanted my bunny to be pink, white and purple so I'm starting off here by blocking in my pinks and purples. In our reference image where the bunny has black fur spots, I'm using purple, and where the bun has beige, I'm using pink!

Now I'm going to go in with a darker value purple to line out the eyes, nose and mouth!

For the bunnies facial features I'm starting off by adding a little dash of pink under the eye, along with adding white for highlights! To get the effect of eyelashes, I just take my small detail brush and do soft outward flicks with the purple paint

I then go on to add more pink to the inside of the bunnies ear, around its mouth and top of its nose!

And for one final little touch, I add just a dash of purple under the mouth here for added depth!

Moving to the bunnies wings, we're going to start off with filling them in with a soft blue! (or green, yellow, pink, it's your bunny!) :)

I really enjoy painting my bunnies with monarch butterfly inspired wings, so to do that I'm going to outline them in more dark purple, and paint these little "Y" shaped lines in the middle

From there, I'm going to add a few more lines attaching those "Y"s to the outline of the wing! You can do this in any pattern you like, there aren't any rules!

Our next step is going to be filling in our little cloud with some white paint! I just adore these little fairy critters floating in the sky. This is also the point where I went ahead and filled in the rest of the bunnies fur (that isn't pink or purple) with white paint!

For the bunny's wings, we're going to take more of our white paint and add little dots around the edge on our dark outline! Varying them between big and small gives a very happy visual effect! Kind of like they're all unique little bubbles

Getting to some fun little details, we're going to put little speckles/freckles on our bunnies snoot! I'm using dark purple again here with a detail brush

I'm now going to start focusing on shading and light! So here I'm taking my dark purple and outlining the right half of our little bun friend. I also added a little bit in the middle of the bunny to better contrast its arm and bottom legs!

It was also at this point that Faye fell asleep on me while painting <3

For highlight, I'm going to add some light yellow to the center of the bunny, and on the left side of it's face! I just mixed a little bit of my lemon yellow with white and applied it generously

Whiskers are next! I just used white paint- but since I'm working in wet oil paint, a little bit of the purple/pink pulls through and creates these lovely shading effects! Paint is the neatest thing :*)

For the cloud I go in with a little bit of blue and purple to make some happy little hills! Little teeny "hills" that give the cloud some fluff! I also like to pull some of the brushstrokes up off to look like they're floating, it's very playful and painterly in a way I adore


For the firefly fairy we're going to add a dab of lemon yellow plant and dab it out- you can use a brush, but I'm just rubbing it with my finger! the goal is to just lightly blend it out so it looks like a soft circle


I hope that this was an enjoyable experience for you, and I hope you're proud of the wonderful art you've made. There is no good or bad, right or wrong, just an experience we have gotten to share together, and an experience you've had with yourself! I love you and hope you have a chance to smile today, I'll see you again soon!
-Shelby